
The wgui application provides fast file copy and block level synchronization between the local machine and a remote machine running the wfstd service. It provides all the features of the wftp command in a more convenient graphical user interface.
- Starting wgui
- Screen Layout
- Getting Help
- Connecting to a Server
- Navigating the File System
- Copying Files
- Setting Options
- Quick Options
- Saving Your Settings
Starting wgui
To start wgui on Linux, run it from the command line. If you have updated your PATH environment variable as recommended in Getting Started, simply run "wgui". Otherwise run "/opt/wfst/wgui". On Windows you can either run wgui from the command line or double click on its icon in the WANFast start menu folder.
wgui is simply a front end to the wftp program. When you start wgui, it will create a captive instance of wftp and send it the necessary commands to perform any requested operation.
Screen Layout
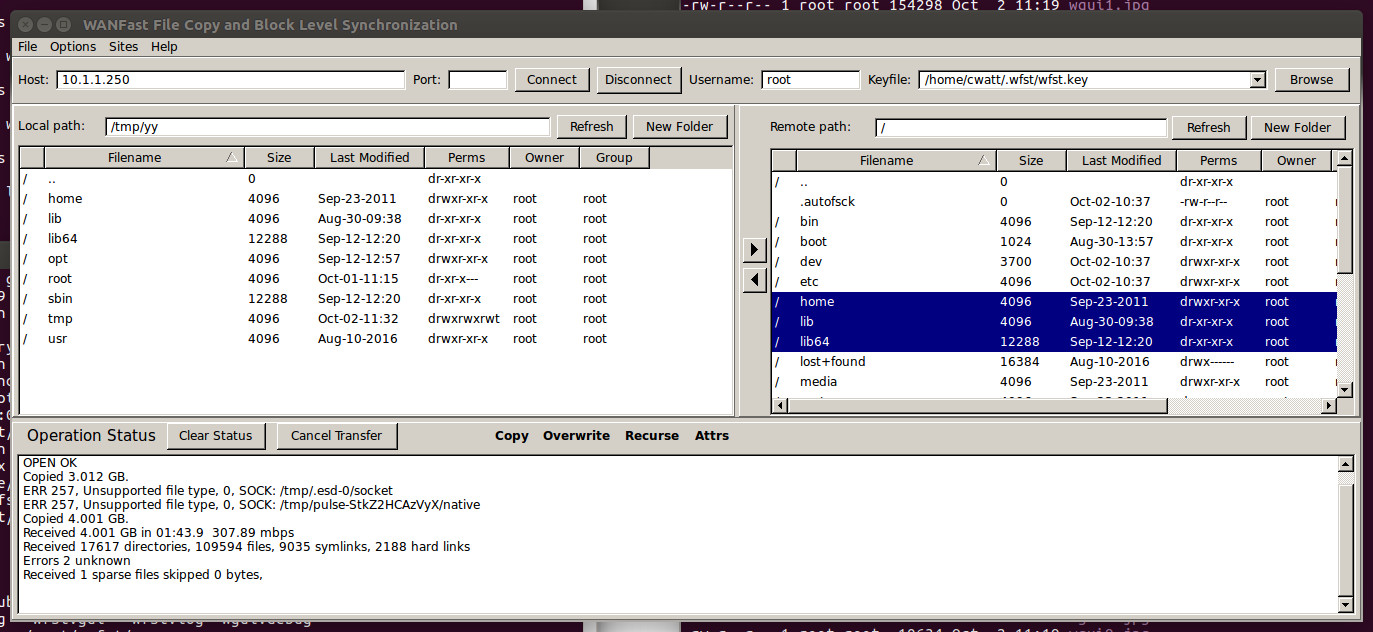
On your first invocation, the wgui screen will look similar to the picture below.
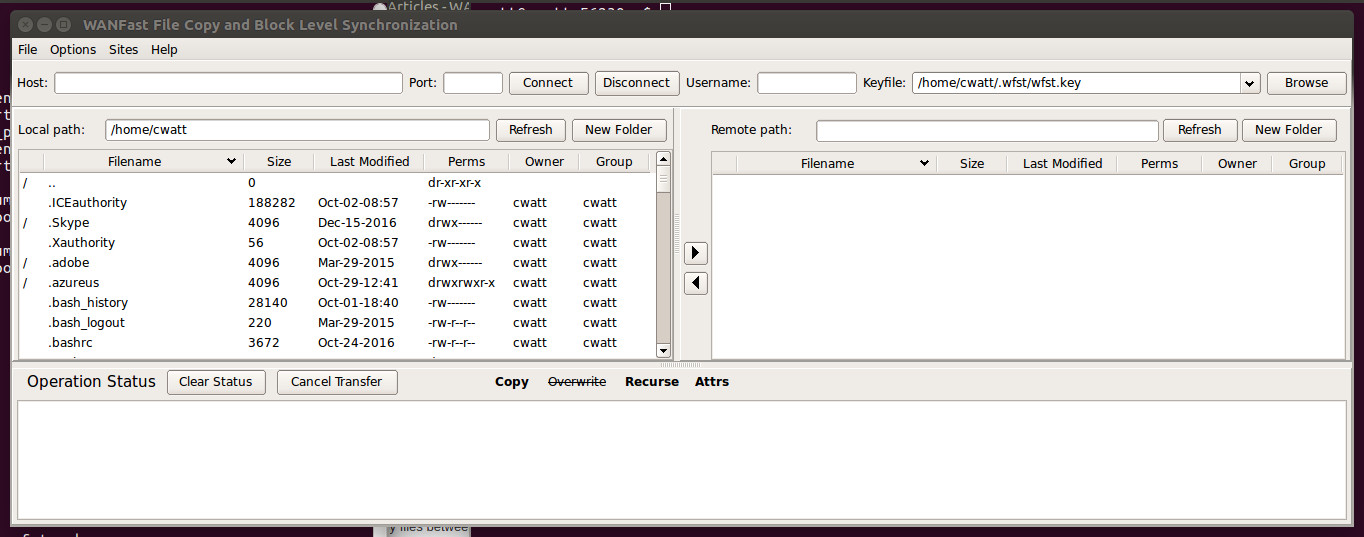
The top menu bar contains the Files, Options, Sites, and Help drop down menus. The horizontal panel directly below this, from Host to Browse, displays the current connection information. The panel on the left from Local path to New Folder displays the current working directory on the local machine and the contents of that directory. The panel on the right, from Remote path to New Folder displays the current working directory on the remote machine and the contents of that directory. The bottom panel displays the status of the most recent operations.
The directory listings in the local and remote panels display a single line for each child of the directory. A single character field at the far left will display a forward slash, '/', if the path is a directory. Otherwise, this will be blank. This is followed by fields for the file's name, size, last modification time, file attributes, owner and group. You can sort the directory list based on any of these fields by clicking on the field header bar. Clicking a 2nd time on the same header bar reverses the order of the sort.
On Linux the Perms field displays the standard Linux file permissions. On Windows this displays special file attributes. The first character may be a 'd' for a directory, 'l' for a symbolic link, or '-' for anything else. On Windows you may also see the following attributes:
- R Read only
- H Hidden
- S System file
- C Compressed
- E Encrypted
- s Sparse file
You can select one or more files or directories for an operation (transfer, delete, copy, etc) by clicking on its entry in the local or remote panel. Selected files will be highlighted in the panel. You can select multiple files by holding down the control key while selecting. You can select a range of entries by holding down the shift key while selecting.
You can change the relative size of the wgui panels. If you want to display more or less of the Operation Status, there is a slider control at the top of that panel. Click on the control and drag it up or down to increase/decrease the size of the panel. If you want to change the size of the local or remote panel, there is a slider control between them on the right edge of the local panel. Click on this and drag it to the right or left to change balance between the two.
Getting Help
All wgui fields have mouseover text explaining their use. If you need more detailed or high level help while working with wgui, click on the Help drop down menu and select the Help option.
![]()
This will raise your default web browser and return you to this page. For help on command options, refer to File Copy, Backup, and Synchronization.
Connecting to a Server
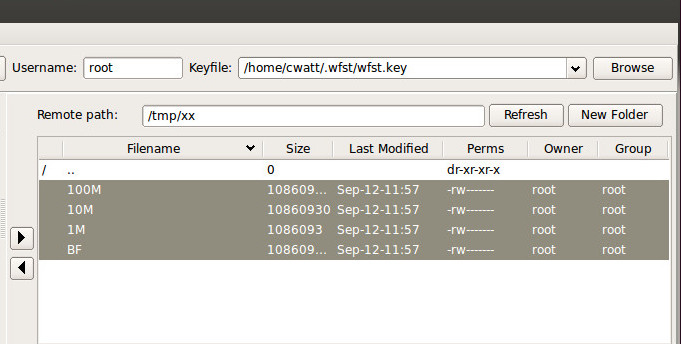
To connect to a server running the wfstd process, enter the server's domain name or IP address in the Host field and click on the Connect button. If the server is running the wfstd process on a port other than the default, 4900, you will need to specify the port value in the Port field. If you wish to connect to the server with a username other than your current account ID, then specify the name in the Username field.

If you need to use a WANFast key pair other than your default, click on the Browse button to bring up a file browser window.
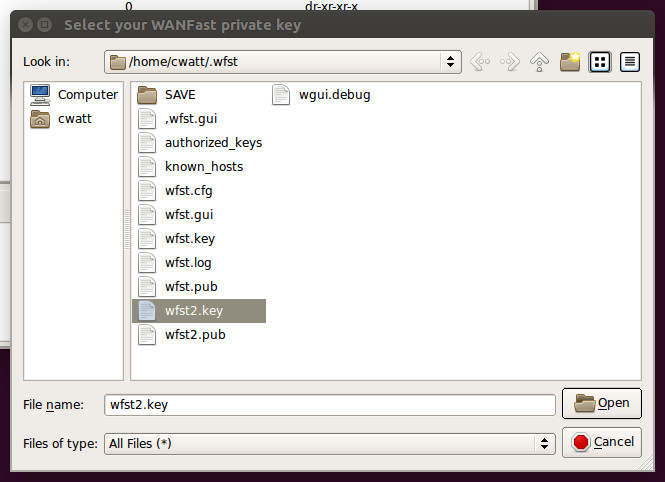
Navigate to the directory containing the desired key pair. Select the private key file and click on the Open button. Note that the matching public key must reside in the same directory and must have the same basename as the private key with the extension ".pub".
wgui will remember all of the keys that you use. You can select the desire key for a given connection fro this list using the Keyfile drop down menu.
![]()
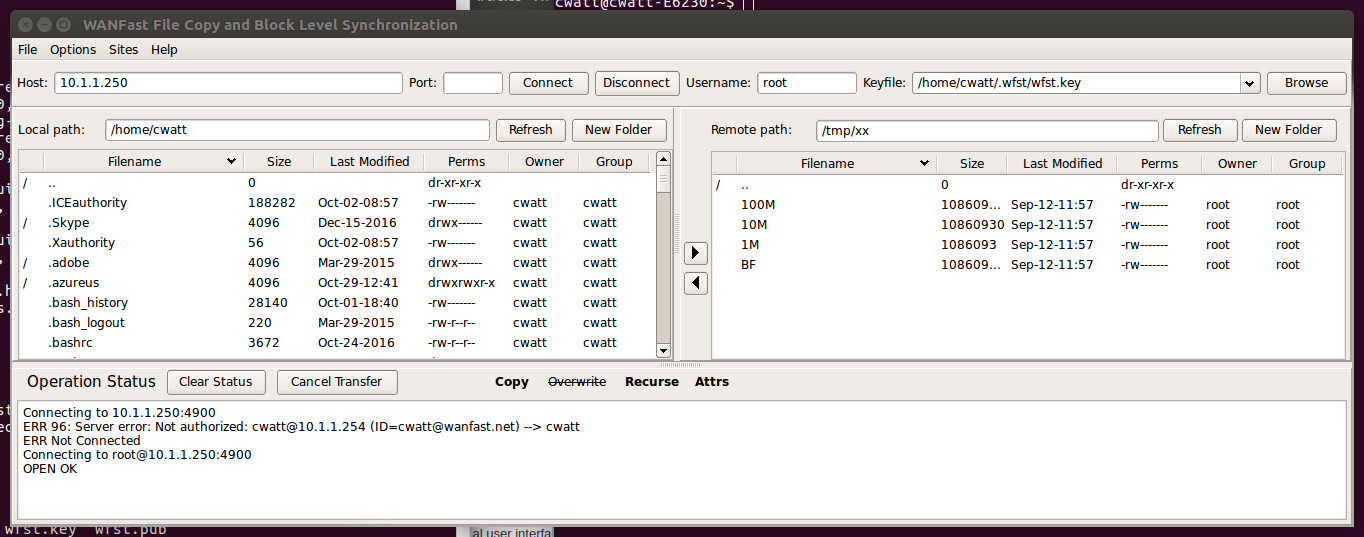
Connection Errors
If there is an error during connection, a message will be displayed in the Operation Status panel.

In order to create a connection,
- The remote machine must be running the wfstd daemon process.
- The port used by the wfstd process cannot be blocked by a firewall.
- If the wfstd process has been configured with a port other than 4900, then you must specify this non-standard port in the Port field
- You must have a valid WANFast key pair configured on the local machine. The path of the private key must be displayed in the Keyfile field.
- The security critical WANFast files on the local machine must have the proper security attributes set. If you get an error message telling you that you have insecure file permissions, run the wfstPerms command to set them correctly.
- The target account (UserName field) on the remote machine must have a valid authorized_keys file containing your WANFast public key.
- The security critical WANFast files on the remote machine must have the proper security attributes set.
Navigating the File System
When you have successfully connected to a remote system, the left and right panels will display the current working directory for each machine. You can change the current working directory by changing the contents in the Local path or Remote path field. When your cursor leaves the field, the directory contents will automatically be updated. If at any time the displayed directory contents become out of date (perhaps due to modification of the directory by some program other than wgui), you can refresh the listing by clicking on the Refresh button.
You can also change the current working directory by double clicking on a directory entry in the panel. This will set the current working directory to that path and display its contents. To move up one level, double click on the ".." directory entry.
To create a new subdirectory in the current working directory, click on the New Folder button in either the local or remote panes. Enter the path name in the pop up window and click the OK button. You can enter a relative or absolute path.

To delete, move, or copy a file/directory, or on Linux change a files permissions, owner or group, select the entries in the panel and click on them using the right mouse button. In the resulting pop up menu
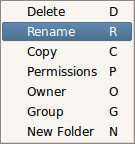
select the desired operation. See wftp Client Command Syntax and Configuration Options for details on the specific operations.
Copying Files
To copy files or directories from one machine to the other:
- Make sure that the configuration options are set to provide the type of transfer that you want -- e.g. copy or sync, overwrite existing files or not, delete extraneous files on target or not, etc. See Setting Options below for details on the various options and how to set them.
- Select the files/directories to copy in the local or remote panel
- Set the current working directory on target machine to the location where you want the files copied.
- Click on the Arrow button between the two panels. Be sure to click on the button pointing in the direction you want to make the transfer.
To get files from the remote machine, select the files in the remote panel and click on the < arrow. To put files from the local machine to the remote machine, select the files in the local panel and click on the > arrow.
As the operation proceeds, its status will be updated in the Operation Status panel. The directory list in the target panel will only be updated when the entire operation has finished. When complete, the status display will show any errors that were encountered during the operation. As you can see from the error message in the example above, wftp does not copy Linux sockets (or devices or proc file system entries). Upon completion the display will also give a summary of everything transferred including the total size and transfer rate.
Controlling the Level of Status Feedback
During the actual operation there are three levels of status feedback. You can set the desired level using the Verbose option on the Common Options page as described below in Setting Options.
Verbose Level 1 -- Displays the total amount of data transferred so far.

Verbose Level 2 -- [Default] Displays the estimated transfer size, the total amount of data transferred so far, a bar graph of the percentage complete, and an estimated completion time. Note that in order to provide this information, the source machine must first walk the list of selected files to produce an estimated transfer size. It copying a huge file system, this can delay the apparent start of the operation.

Verbose Level 3 -- Displays that status of each file as it is transferred. As a large files is transferred, it will display a bar graph of the current percentage complete for that file. Note that this level is not recommended if you are transferring thousands of very small files. The speed at which they get transferred can overwhelm the wgui display thread causing it to freeze.

All three levels will print transfer errors to the status output, and will print the operation summary when complete.
Canceling a Transfer
To cancel a currently running operation, click on the Cancel Transfer button on the Operation Status panel. This will actually close the connection with the remote machine. Before running another operation you will need to reconnect.
Clearing the Status Output
You can clear the status output panel by clicking on the Clear Status button on the Operation Status panel.
Viewing the Log File
The Operation Status panel only saves the last 500 lines of status. The wfst.log file more permanently saves any errors that occur. You can view the log file by clicking on the File drop down menu and selecting View Log File.
![]()
Clearing the Log File
To clear the log file, click on the File drop down menu and selecting Clear Log File.
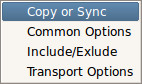
Setting Options
The full set of options supported by wgui are described in wcp Client Command Syntax and Configuration Options. Detailed examples are given in File Copy, Backup, and Synchronization. wgui splits the options into four sections which are accessed by clicking on the Options drop down menu.
Copy or Sync Options
The Copy or Sync Options control whether wgui is doing a simple file copy or an advanced block level sync. See File Copy, Backup, and Synchronization to understand the differences between them and their specific options.
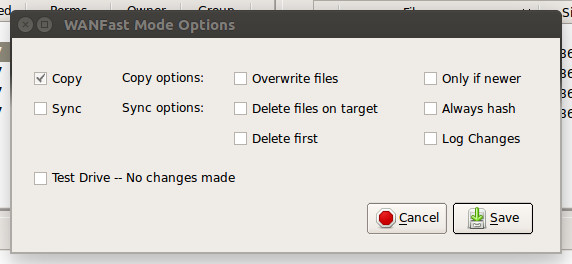
If you select a copy operation, by default wftp will refuse to overwrite a file on the target, displaying an error in the Operation Status panel for each failed operation. If you select Overwrite files, then files will be silently overwritten. If you select Only if newer, then files will be silently overwritten if the file on the source r than the file on the target.has a more recent last modification time than the file on the target.
If you select a sync operation, by default wftp will ignore any files on the target that are not on the source. If you select Delete files on target, then the extraneous files on the target will be deleted so that the target exactly matches the source. Note that the delete only applies to files within directories that are copied whole. If you select Delete first, then wftp will perform the operation in two phases. During the first phase it will delete the extraneous files on the target and truncate any files on the target that are larger than the corresponding file on the source. On the 2nd pass it will sync changes from the source to the target. This ensures that the target machine does not run out of disk space due to large extraneous files.
By default during a sync operation, wftp first compares a file's size and last modification time on the source and target. If the files are the same size and were last modified at the same time, it skips the file. Otherwise it compares the files a block at a time looking for differences. Obviously it is much faster to skip the file, if possible. That means that for a sync operation to work most efficiently, you should set the Preserve file attributes option on the Common Options page so that the modification time is preserved on the copied file.
There are some rare cases where you might not trust the file size and modification time. For example, Windows only updates a file's modification time when the process writing to the file closes its file handle. Thus if you sync a file while it is currently being modified by another process, you will copy all of the changes that have been made but the modification time might reflect an older date. Thus it is very important that on your final sync between two machines, both machines are inactive during the sync. If this should ever be an issue, set the Always hash option and run another sync. This will cause wftp to ignore the file size and time and always do a block comparison.
If you select the Log Changes option, wftp will write a record of all changes made to the target machine during a sync operation to its log file.
If you select the Test Drive option, wftp will display the changes that it would make without actually making any changes. Be sure to set the Verbose level in the Common Options to 3 so you get a per file report.
Common Options
The Common Options are common to both copy and sync operations.
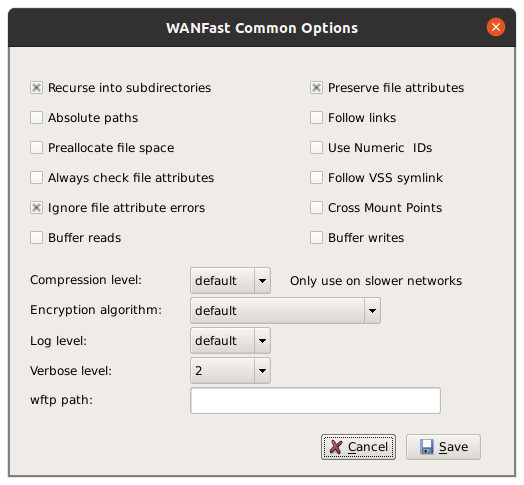
Recurse into subdirectories -- If checked, wftp will recurse into subdirectories and send the directory contents.
Preserve file attributes -- If checked wftp will copy the file's attributes along with the file. This is essential when running a sync operation to ensure that file times are preserved. Note that preserving some of the attributes such as file owner on Linux or ACLs on Windows requires root or Administrator privilege. If you do not have this, then wftp will copy as many of the attributes as it can, but consider the operation an error. To avoid seeing an error status line for each attribute failure, be sure to set Ignore file attributes.
Absolute paths -- If checked, the full path of the source is written to the current working directory on the target. For example, if you copy /usr/lib64/lib.so to /tmp/xx, you will get /tmp/xx/usr/lib64/lib.so rather than /tmp/xx/lib.so. This is useful for creating backups where you wish to preserve the full structure of the source file system within a backup directory on the target.
Follow links -- By default wftp copies a symlink from source to target, preserving the link. If you check this option, it will copy the file pointed to rather than the link.
Preallocate file space -- When checked wftp will allocate all the space required for a file on the target before it begins to copy the file. This causes wftp to detect disk space issues quickly when copying large files.
Use Numeric IDs -- By default when preserving file attributes, wftp uses the human readable version of user and group IDs. On Linux it translates user and group IDs to user and group names. On Windows it translates SIDs to the human readable Domain Name and Entity Name. If a name is not recognized on the target, there will be an error setting the attributes. If this option is checked, the IDs are sent instead in their raw or numeric format, and the target applies these raw values to the file attributes. This is particularly useful when migrating an entire server image as the ID won't be recognized on the target until the migration has finished.
If a raw ID is not recognized on the target after the operation, you can easily map the unknown ID to another value that is recognized on the target. On Linux you can run:
find . -uid UnknownIDValue | xargs chown KnownUserName
This is a bit more involved on Windows:
In Powershell using Get-Acl and Set-Acl you can modify the ACL by manipulating the SDDL string.
First get the ACL object.
      $acl = Get-Acl -Path C:\YourFile.txt
Now get the SDDL string:
      $sddl = $acl.sddl
Now you can replace the SID in the string with what you want. This uses a regular expression to update partial matches.
     $sddl2 = $sddl -replace "UnrecognizedSID", "ExistingSID"
Then update the ACL object:
     $acl.SetSecurityDescriptorSddlForm($sddl2)
Then set the object's ACL:
     Set-Acl -AclObject $acl -Path C:\YourFile.txt
Always check file attributes. -- By default during a sync operation, wftp will not update file attributes if the file is skipped due to size and modification date. If this option is set, it will always update the file attributes even if the file is skipped. This can be necessary on Windows because Windows does not update the file's modification date when you change file attributes.
Follow VSS symlink -- On Windows, a shadow copy is typically exposed to the system using a directory symbolic link. By default wftp will simply copy the link and not the contents of the shadow copy. Setting this option tells wftp to follow the link rather than copy it -- rather like the Follow links option above, but it only applies to the VSS link.
Ignore file attribute errors -- When set, errors that occur setting file attributes are counted and reported in the summary report, but you do not generate a separate error message for each file. This is convenient when you want to preserve file attributes to aid in block level syncing, but don't have the administrative privilege necessary to set all the attributes.
Cross mount points -- If checked when recursing, file copies will cross a volume mount point, otherwise they will not.
Buffer reads -- Make all file reads in blocks of 1MB where possible to improve performance on slow file systems such as old disk drives or network file systems.
Buffer writes -- Make all file writes in blocks of 1MB where possible to improve performance on slow file systems such as old disk drives or network file systems.
Compression level -- By default wftp compresses your data on the fly using lz4 compression while sending. The data is then decompressed on the receiving end so that your files are restored to their normal state. Lz4 is currently the fastest compression algorithm, but provides the least amount of compression. Overall it is a good balance for transfer rates up to about 400Mbps. If your WAN transfer rate is faster than this, then you should turn off compression as it will only slow you down. If your transfer rates are significantly less than this, perhaps in the 50Mbps range or lower, you should consider trying one of the zlib compression levels. These are slower, but provide significantly improved compression ratios. In slower network environments they can dramatically increase your overall throughput. The slower your transfer speed, the more you can potentially gain. The zlib compression values are numeric from 1 to 9. Level 1 provides the least compression, but runs the fastest. Level 9 provides the most compression, but runs the slowest. Level 5 is a decent default value. Use the Compression level drop down box to turn compression on/off and select the compression level.
Note that trying to compress data that is already compressed will only slow down your transfer speed. Obviously compressed files like .zip and *gz are already compressed. Music files (e.g., mp3, aac, etc), Image files (.jpg or .jpeg) and Video files (e.g., mp4, avi, etc) are already compressed. WANFast uses auto-sensing compression, if you are transferring a mix of files, some compressed and some not, WANFast will automatically identify and compress the uncompressed data and leave the compressed data untouched so you are not slowed down by needless compression.
Encryption algorithm -- Allows you to change the encryption algorithm used by the WANFast tunnel. By default wftp uses the fastest strong (128-bit key or larger) encryption algorithm for a given function. You can change the algorithm used if necessary -- for example, if you are required to use an AES algorithm. See Data Encryption and Integrity for more information.
Log level -- Sets the verbosity of information written to the wfst.log file. Changing this is only useful if debugging.
Verbose level -- controls the details in the Operation Status display as discussed above in Controlling the Level of Status Feedback.
wftp path -- Allows you to specify the path to the wftp program if it is not in your PATH or the default location.
Include/Exclude
The include/exclude options allow you to control which files/directories get transferred. You can enter individual include/exclude patterns in the patterns field. You can also specify a file containing include/exclude patterns using the Pattern file field. See Selecting Files to Copy for more information.

Transport Options
The Transport Options allow you to control the underlying WANFast transport mechanism used to transfer file data. By default wftp will use WANFast's nonsequenced tunnel mechanism as that is faster in most environments. You can change this to WANFast's sequenced tunnel mechanism using the Data delivery drop down list. The Pool size drop down list controls the number of TCP connections used for data transport. By default this is six. Adding additional connections can improve transfer time on networks that have a very long RTT (packet round-trip time) or a high packet loss. The Control Pool size drop down list controls the number of TCP connections in the command control pool. By default this is three. Increasing this number can occasionally help when your network has a very high packet loss.
![]()
Using the Max bandwidth field you can limit the maximum network bandwidth consumed by wftp. It takes an integer value specifying the maximum bandwidth in Mbps.
Quick Options
The Quick Options buttons tell you in a single glance the most commonly used wftp options. These buttons reside on the Operation Status panel to the right of the Cancel Transfer button.

The first button tells you the primary operating mode and will read either Copy or Sync. If the mode is copy, then the 2nd button will read Overwrite. if this is in bold case, then the overwrite option is turned on. If struck out, then it is off. The next two fields are Recurse and Attrs to tell you whether the options to recurse into subdirectories and copy file attributes are on or off. If on, they will be in bold case. If off, they will be struck out. To change any of these values, simply click on it.
Saving Your Settings
wgui saves your most current settings when you exit the program and restores them when next run. You can also save configuration profiles and reuse them with the Site drop down menu on the menu bar. To save a profile, click on the Site menu and then New. This will raise the Site Editor pop up screen.
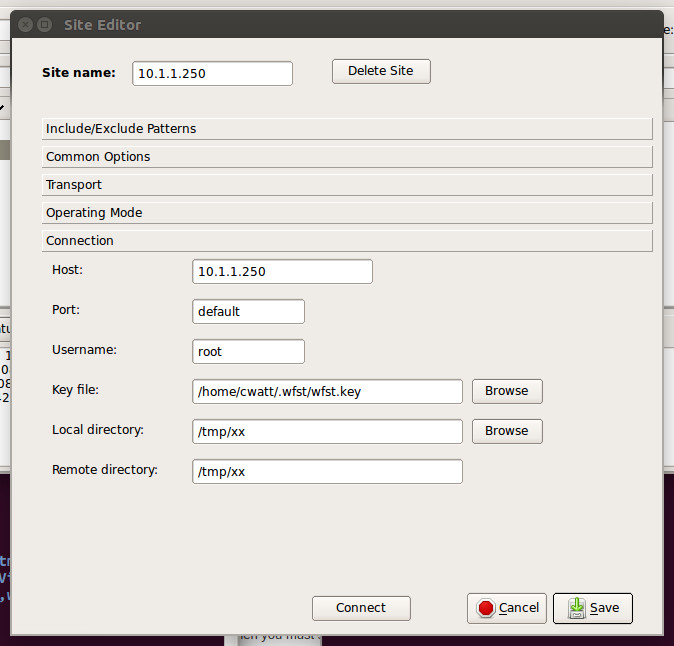
Give the profile a unique name in the Site name field. By default this will be set to the Host name or IP address. All other configuration settings are taken from the current values. You can choose to change any of them using the Site Editor. The editor has five tabs. The Connection tab specifies the connection information as well as the starting current working directories for the local and remote machines. The four other tabs provide access to the four options screens described above.
When ready, click on the Connect button. This will save your profile and connect to the remote host. If you do not wish to connect at this time, simply hit the Save button to exit and save the profile, or Cancel to discard the profile.
Using a Saved Site Profile
To use a saved site profile, click on the Site drop down menu on the menu bar and select the saved site.
![]()
This will raise the Site Editor window displaying your saved profile. You can then make any changes using the Site Editor tabs or connect to the remote host using the Connect button.