
The wrepl program provides a graphical user interface (GUI) for configuring, controlling, and monitoring the WANFast Continuous Replication process that copies data from the volumes on a source machine to a target machine. It was designed for the continuous, automated replication. If you simply wish to perform a one-time copy between machines, you are probably better off using the wgui graphical file transfer application or the wftp or wcp command line interfaces (CLI).
You can run wrepl on either the source or target machine, or as shown in the figure below, on any Windows or Linux "control" machine that has network access to the source machine. The program wsyncClient gets installed with wrepl. It provides a CLI to all the features of wrepl and is designed for use by shell scripts and 3rd party software. If you would prefer to use a CLI, refer to the wsyncClient User's Manual.

Note that you can see an enlarged version of any figure in this document by clicking on the figure.
Using wrepl to Copy or Replicate Your Volumes
- Install and Configure the WANFast Continuous Replication Components on the source, target, and control machines.
- Start the wrepl user interface on the control machine.
- Connect wrepl to the source machine
- Connect the source machine to the target machine
- Map the source volumes to target storage
- Select the volume operation: One-time volume sync, recurring volume sync, continuous replication
- Set any global configuration values
- Run the operations
- Monitor operation status
- Halt operation
Starting the Interface
From a command prompt window, run the command wrepl. If the command is not found, make sure that you have updated your PATH environment variable (see Getting Started). On Windows you can also find wrepl in the WANFast folder of the Windows Start Menu. After running the command, you should see the initial wrepl display:
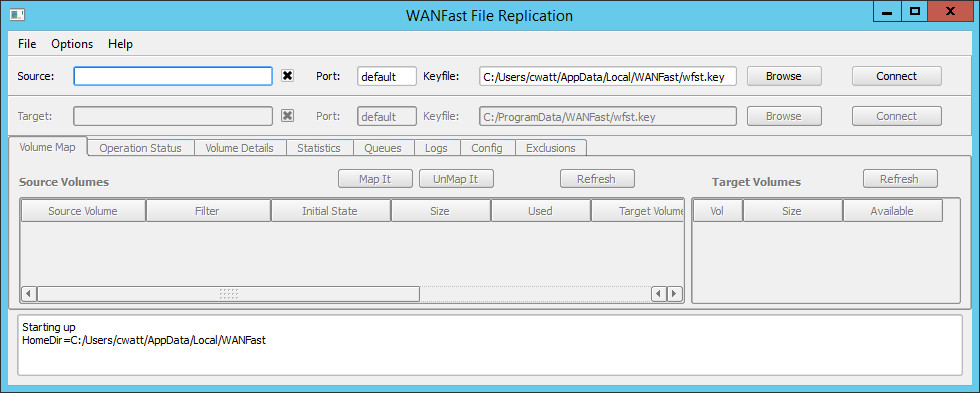
The display is organized into the five horizontal sections listed below.
- The top Menu Bar. This has three menus:
- The File menu, from which you can exit the program,
- The Options menu, from which you can save the current configuration settings or delete the content of the bottom notification display,
- The Help menu, from which you can access online help, including help with regex syntax for exclusion rules, and check the the program version and credits.
- The Source Connection information that is used to connect wrepl to the wsyncr service running on the source machine.
- The Target Connection information that is used to connect wsyncr on the source machine to the wfstd service running on the target machine. After the source has connected to the target machine, the Source and Target sections are converted to display status information and provide access to the System Control Buttons that are used to start and stop operation.
- The Primary display area that is organized into a set of tabbed pages:
- The Volume Map tab that is used to map the source volumes. Mapping a volume includes selecting the destination for the data on the target machine's available storage and selecting the operations to perform on the volume.
- The Operation Status tab that is used to monitor and control the configured volume operations.
- The Volume Details tab that displays detailed information about a volume and any operations that have been performed on the volume.
- The Statistics tab that displays details about the driver configuration, driver statistics, and accumulated statistics from the replication process and most recent sync operation.
- The Queues tab that displays the current status of the replication change queues including the amount of disk space consumed, if any.
- The Logs tab that displays the log file from the source machine's wsyncr process. It can also filter the log file to display any errors that have occurred.
- The Config tab that is used to make any changes to the system configuration.
- The Exclusions tab that is used to display and edit the exclusion and inclusion rules that determine which portions of the source volumes will be replicated to the target. Note that it is easier to specify rules that pertain to a single volume using the Source Volume Mapping screen that is accessed from the Volume Map tab. The Exclusions tab should only be used for specifying global rules that apply to all of the source volumes.
- The bottom Notification panel that displays program status information, warnings, and errors. The Notification Panel can be cleared using the Options menu on the menu bar.
Connecting to the Source Machine
If you are running wrepl on the source machine, leave the Source field blank (see the figure above) and the Port field set for default. The Keyfile path should be set to your personal WANFast private key. If you followed the instructions in Installing and Configuring the WANFast Replication Components, your matching public key should already be copied into the source machines authorization file. If not, do so now. If the Keyfile is correct, click on the Connect button to connect to the source machine. If the key file is not correct, or if you are using a key file other than your default, then enter the path to your key file on the control machine, or click on the Browse button to look for it.
If you are running wrepl on a control machine other than the source, then you will need to specify the source machine's IP address or host name in the Source field. If wrepl has been configured to use an API port other than the default, then you will need to specify its API port in the Port field.
The checkbox to the right of the Source field is used to enable or disable strict checking of the source machine's public key. When checked, wrepl will automatically accept the source machine's key. When not checked, wrepl will run in strict security mode and the connection to the source will only be permitted if the source machine's key is already registered in the known_hosts file in your account's WANFast directory. See the section Verifying Server Identity in WANFast Security for details on how to set this up.
You are now ready to click on the Connect button to connect to the source machine.
After you have connected to the source machine, the Source Connection portion of the display will switch to the Source Status as shown below. If the connection to the source fails, check the Notification Panel at the bottom of the display. If you see an error Server error: Not authorized ..., then make sure that the WANFast public key for your account has been added to the source machine's authorization file.
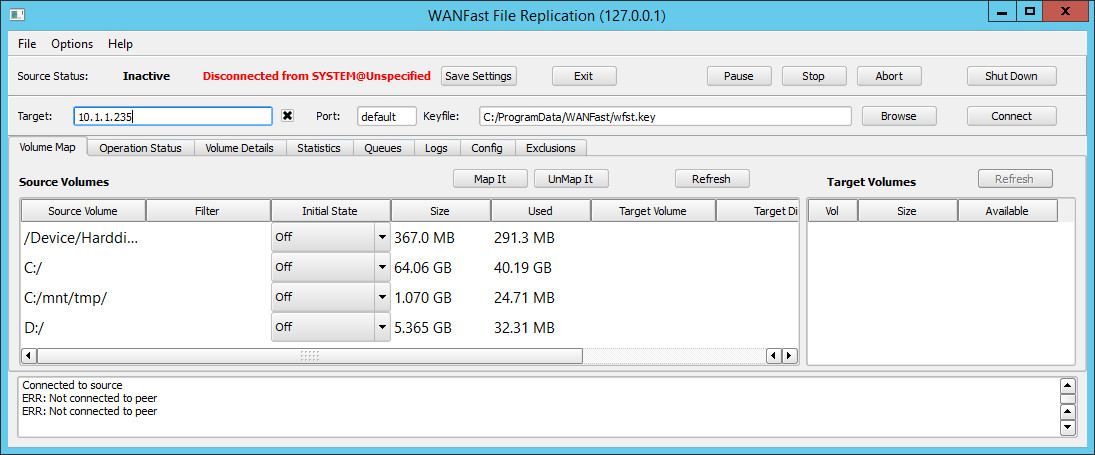
The Source Status consists of two values: the current Operation Status and the Connection Status. The main body will display the Volume Map tab with a list of all the volumes discovered on the source machine in the panel on the left.
The current Operation Status will display any of the following:
| Inactive | The source is not processing any volume operations |
| Running | The source is actively processing operations. although none might be running at this time |
| Pausing | The source is completing all current operations and will then pause, keeping the change queue running |
| Paused | The source is not processing operations, but all volume changes are being queued in case you schedule an operation in the future |
| Stopping | The source is completing all current operations. The system will then move to the inactive state. No further changes will be queued |
| Aborting | All current operations are being failed immediately. The system will then move to the inactive state. |
The Connection Status value will be either Connected or Disconnected to display the current state of the connection between the source and target.
If there was an issue connecting to the source, you will see an error message in the notification panel at the bottom of the display.
Connecting the Source Machine to the Target Machine
To connect the source machine to the target machine, supply the target machine's IP address or host name in the Target field as shown in the figure above.
The displayed Keyfile is the path on the source machine to the source machine's private system key. The matching public key should already be copied into the target machines authorization file if you followed the instructions on Installing and Configuring the WANFast Replication Components. If not, do so now. If for some reason you need to use an alternate key pair, type the path to the private key into the Keyfile field or click on Browse to find it. Remember that this is a path on the source machine. Also be sure to add the matching public key to the target machine's system authorization file.
If the wfstd service on the target machine is configured to use a server port other than the default, then you will need to specify its service port in the Port field.
The checkbox to the right of the Target field is used to enable/disable strict checking of the target machine's public key. When checked, wsyncr (running on the source machine) will automatically accept the target machine's key. When not checked, wsynr will run in strict security mode and the connection to the target will only be permitted if the target machine's public key is already registered in the source machine's system known_hosts file. See the section Configuring Secure Access for details on how to set this up.
You are now ready to click on the Connect button to connect the source to the target. If successful, the Target Connection portion of the display will switch to the System Status as shown below. If the connection to the target fails, check the Notification Panel at the bottom of the display. If you see an error Server error: Not authorized ..., then make sure that the source machine's WANFast public key has been added to the target machine's authorization file.

After connecting to the target, the Connection Status field will update to Connected. The Target Volumes panel on the right of the main display will show the status of the target machine's volumes.
The Target Connection fields are replaced with the System Status display. This includes the Up Time, which displays the length of time for that wsyncr has been up and running, and the Lag Time, which displays the oldest data in the change queue that has not been replicated to the target. The Lag Time will remain zero until the system enters the run state and starts collecting data.
Be sure to click on the Save Settings button after you have connected the source to the target to save your connection settings.
Reversing the Direction of Connections
By default, all network connections between the source and target machines originate with the source. Thus, the source machine must be able to make a TCP connection to the WANFast service port on the target machine. If this is not possible -- perhaps the network firewalls do not allow incoming connections to the target machine -- then it is possible to reverse the direction of the connections so that that the target machine connects to the source. To configure this:
On the source machine, edit the wsyncr configuration file, C:\ProgramData\WANFast\wsyncr.cfg. Add the following line to the end of the file:
sync-reverse-conns = True
Stop and then restart the wfstRepl service on the source machine so it will pick up the change.
On the target machine, edit the wfstd configuration file, C:\ProgramData\WANFast\wfst.cfg. Add the following lines to the end of the file:
sync-reverse-conns = True
login-name = SYSTEM
server-address = SOURCE_IP_ADDRESS
where SOURCE_IP_ADDRESS is the IP address or host name of the source machine. Stop and restart the WANFastD service.
Verify that the firewalls on the source side of the connection are configured to permit connections to the WANFast API port on the source machine.
Restart wrepl. After you log into the source machine, the target will automatically connect to the source after a minute or two.
Mapping Volumes
The wsyncr process will not advance past the inactive state until you have configured its volume map. The volume map tells wsyncr:
- Which source volumes to manage
- Which operations to perform on the volume
- If not copying the entire volume, what to copy and what to skip
- Where to put the data on the target
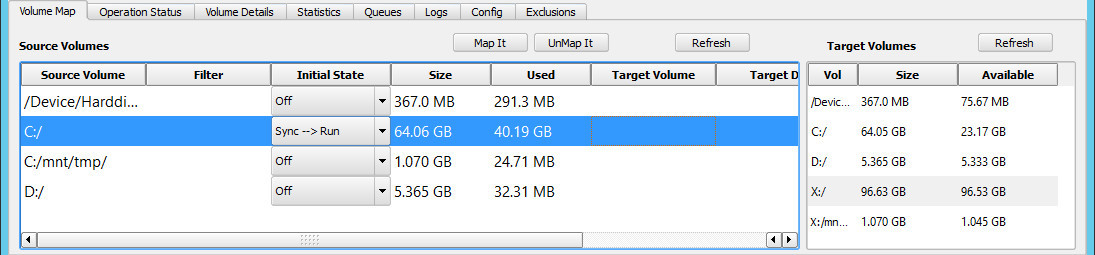
To set up the volume map, click on the Volume Map tab in the main display. If the source and target machines are connected, it will look something like the previous image.
The larger panel on the left displays the volumes discovered on the source machine including the total size and space used for each volume. The smaller panel on the right displays the volumes discovered on the target including the total size and available free space for each volume. These values are displayed to help you map the source file systems to the target storage.
When mapping a volume, it is important that the target volume have enough free space to hold all of the data that you will copy to it, including any anticipated growth in the future. If a target volume becomes full during operation, the current sync or replication process will abort and you will need to fix the storage issue before you can restart it.
If you attempt to map a source volume to a target volume when the source has more consumed space than the target has available free space, wrepl will display a pop up screen with a message warning you of the potential issue. But it will not prevent the mapping as it has no way of knowing how much of the used space on the source will actually get copied to the target volume. Also note that problems may still occur even if no warning is displayed. wrepl has no way of knowing what might get added to the source volume in the future. What fits now may not later. So plan your volume sizing carefully, taking into account both current size and future growth.
For the simple case where you want to map an entire volume from the source onto a corresponding volume on the target, select the source volume by clicking on it. Select the target volume by clicking on it. They should both now be highlighted (the target volume X:/ is highlighted in the figure below although it is hard to see in the image). Specify the desired Initial State from the drop down list. This configures the operations to perform on the volume as described in the next section. Then click on the Map It button. To remove an existing mapping, select the currently mapped source volume and click on the Unmap It button. Note that if you change a mapped volume's Initial State you will need to click on the Map It button again to save the change.
Be sure to click on the Save Settings button to save your volume map when you are finished.
The Source Volume Mapping Screen
For a more complex volume mapping that will allow you to:
- Select which portions of the source volume to copy, or
- Copy into a directory on the target volume
double click on the source volume and use the Source Volume Mapping, which is shown below.
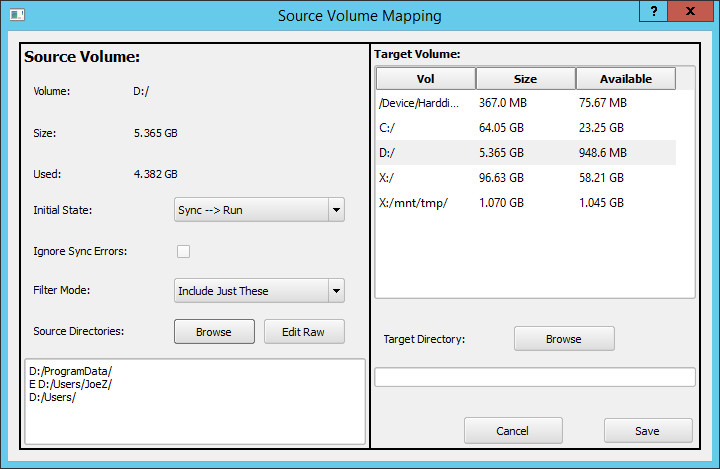
Specify the desired Initial State from the drop down list. This configures the operations to perform on the volume as described in the next section.
If you check the Ignore Sync Errors checkbox, then the volume will transition from the initial sync operation into the replication state even if errors are encountered during the initial sync. This is typically not needed.
Select the target volume to which you want to copy data from the source volume. If you want to copy the source volume into a directory on the target volume, you can either specify the directory in the Target Directory field, or click on the Browse button to find the directory. If the target directory does not exist, it will be created on the target when needed.
If you do not want to copy the entire source volume, then you need to configure some filter rules. If you want to copy the whole volume except for some specific directories, then set the Filter Mode to Everything But These. Click on the Browse button. This will raise the Select Source Directory pop up window. Navigate to the directory that you want to exclude. Note that the Exclude radio button is selected. Click on on the Select button to exclude the directory. Add any additional directories that you want to exclude.
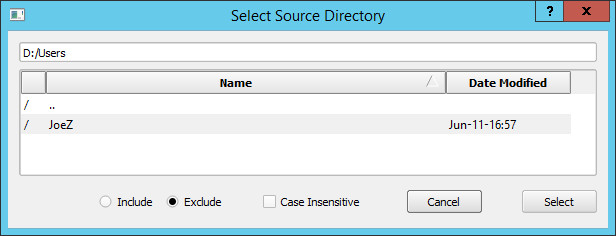
If you want to copy specific directories and skip everything else, then set the Filter Mode to Include Just These. Click on the Browse button and select the directory that you want to copy. Note when selecting the directory that the Include radio button is selected. Add any additional directories that you want to include.
You can mix included and excluded directories. For example, if you want to include just the /ProgramData and /Users directories from your source volume, but want to exclude the directory /Users/JoeZ, then you would:
- Set the Filter Mode to Include Just These.
- Use the Browse button and include the /ProgramData directory.
- Use the Browse button to select the /Users/JoeZ directory, but change the radio button setting to Exclude before selecting.
- Finally select and include the /Users directory.
If you then click on the Edit Raw button, the resulting rules would look like:
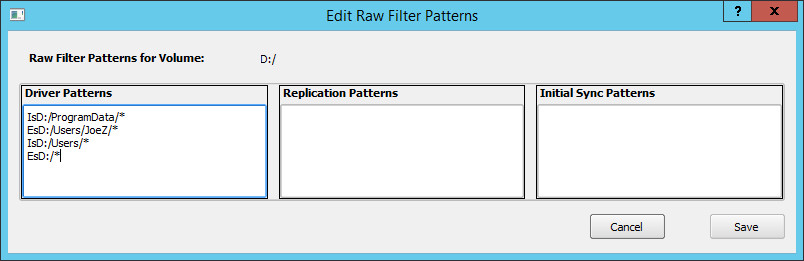
The rules are processed in the order in which they are specified. The first rule that matches a path is used. Therefore you must specify the /Users/JoeZ path before /Users, otherwise it will never be evaluated.
From the Edit Raw Filter Patterns screen you can manually enter more complex filtering rules. But this should only be used by those expert in the use of regex pattern matching. The format of each of the three rules sections is slightly different. See The Exclusions Screen for details on rule syntax.
When you are happy with your Source Volume Mapping, click on the Save button.
Your mapped volumes are displayed in the Source Volumes panel and will look similar to the following image:

For each volume that has been mapped, the Target Volume column will display the mount point of the volume on the target that will receive the data. Note that the source volume, C:/, is mapped to volume X:/ on the target. The source volume C:/mnt/tmp is a volume mounted as a directory. It is mapped to a similarly mounted volume on the target. The source volume D:/ is also mapped to volume X:/ on the target, but its root directory is mapped into the directory X:/SrcVolumes/d on the target, as shown in the Target Dir column. Source volume D:/ also has some supplied filters to restrict which portions of the volume are copied. These are shown in column Filter, but can be better seen by double clicking on the volume to display the Source Volume Mapping screen.
Controlling the Order of Operations
The volumes will be processed in the order in which they appear in the Source Volume list. You can control this order by selecting a volume and clicking on it using the right mouse button. This will raise the volume sequence menu as shown in the figure below.

Selecting Move Up will move the selected volume up one place in the list. Selecting Move Down will move the selected volume down one place in the list. If you want to save the operation order to survive a system restart, be sure to click on the Save Settings button.
The Supported Volume Operations
WANFast's filter driver detects any changes that are made to a source volume, but it does not have access to the original contents of the volume. Thus, the replication process must occur in two separate phases:
- Phase 1: The initial volume copy or verification. The initial contents of the source volume are copied to the target, or, if restarting the process, the contents of the target are verified against the source and updated, if necessary.
- Phase 2: The ongoing change updates. Once the target volume is in sync with the source, all further changes to the source are replicated to the target.
Wsyncr provides two different technologies for the initial volume copy, and three technologies that can be used for the change updates. When you select an Initial State for a volume map, you are specifying which of these technologies to use for each phase. The supported technologies include:
| bsync | A block-based volume copy that uses the Windows block device driver to copy the entire volume content, even unused portions of the volume, from the source to the target. It is very fast as it does not handle individual files, but is inefficient if the source drive is not mostly full. It cannot filter what is copied in any way, and requires a target volume at least as large as the source. If the target volume is larger than the source, then the extra portion will be unused. The bsync operation is typically used only for copying the Windows hidden partition or for the initial volume copy for old, slow disk drives that are mostly full. |
| sync | A file-based sync walks the entire file system on the source volume (or specified portion of the file system if you have any exclusion rules) to ensure that the target matches the source. If a file does not exist on the target, it will be copied to the target. If it exists on the target but does not match the source, it will be updated to match the source. Only the differences will be copied, making the sync operation much more efficient than a full recopy of the volume. If a file exists on the target but does not exist on the source, it will be deleted on the target, or optionally left alone. The sync can be used for both phases. It is less efficient at the update phase than real-time replication, but it supports on all file system types. |
| run | The WANFast real-time replication monitors volume activity to detect any changes made to a volume in real-time. The changes are queued and periodically sent to the target to keep it matching the source. Because it does not need to walk the volume and it only sends the actual changes to the target, replication is the most efficient technology for change updates. For example, it might take a sync operation hours or even days to sync a large, multi-TB volume with millions of files. When replicating the volume, the target may only lag the source by a few minutes. |
Wsyncr supports the following values for the Initial State value:
| sync once | A single file-based sync operation on the volume at the specified date/time. The volume is then put into the wait state. See Start Time below. |
| sync --> sync | A recurring file-based sync operation on the volume that begins at the specified date/time and then repeats at the specified interval. See Start Time and Recurring Interval below. |
| sync --> run | A single file-based sync operation to populate or verify the target volume, followed immediately by real time replication. This is usually the best approach for providing real-time replication. See Start Time below. |
| bsync once | A single block-based sync operation on the volume at the specified date/time. The volume is then put into the wait state. See Start Time below. |
| bsync --> bsync | A recurring block-based sync operation on the volume that begins at the specified date/time and then repeats at the specified interval. See Start Time and Recurring Interval below. |
| bsync --> run | A single block-based sync operation to populate or verify the target volume, followed immediately by real time replication. See Start Time below. |
| run | Skip the initial volume population and transition immediately to the replication state. Note that this should only be used if you are positive that the source and target start off in a consistent state. This might be the case if you are only replicating portions of a volume. |
When you are doing a one-time or recurring sync or bsync of multiple volumes, you can choose to either sync the volumes individually or as a VSS snapshot set. When you choose the latter by checking the Use VSS snapshot sets checkbox on the Config Tab, a single snapshot set will be taken of all the volumes simultaneously. This ensures that the volumes are consistent with one another if you are running an application such as a database server that requires data consistency across the volumes.
Setting the System Configuration
All wsyncr configuration settings can be managed using the Config tab. The most commonly used settings are displayed in the right side panel. These include:
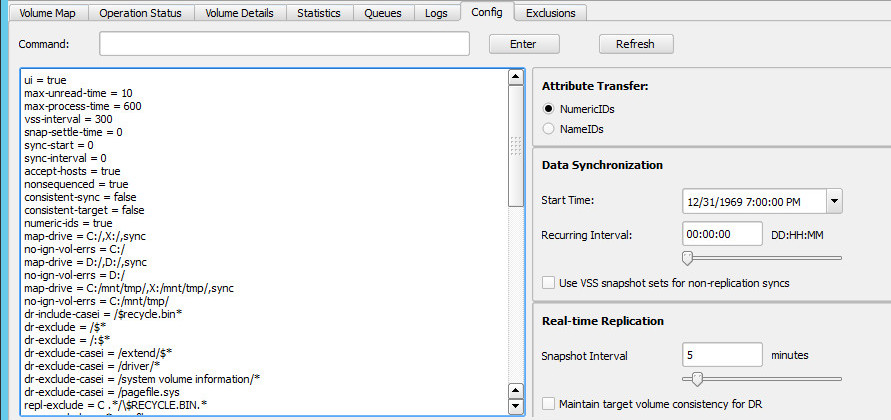
Attribute Transfer -- select between security attribute transfer using NumericIDs or NameIds.
If NumericIDs, the Windows security attributes are sent to the target in their binary format. This is the most efficient method if you are replicating an entire machine, including the hidden Windows volume, or if the source and target are in the some Windows domain.
If NameIDs, the user and group IDs within the Windows security attributes are translated into their printable values, such as Administrator or System, before sending to the target. This is useful when the target is not a replica of the source and is not managed by the same domain controller. Note that if the source sends an account name that is not recognized by the target, a warning will be generated and the attributes on the target will not exactly match those on the source.
The Data Synchronization section is used to control volume sync and bsync operations. Start Time specifies the starting date and time for the initial sync operation. If you are replicating a server with large disks, you can then schedule the initial volume copy to occur at a non-peak time to minimize its impact upon the source machine. If you have chosen a recurring sync operation for one or more of your volumes, the Recurring Interval specifies the time interval between successive sync operations. The interval is measured between the start of one operation to the start of the next. If the actual copy takes longer than the requested interval, the next operation will begin immediately. This setting is usually used in conjunction with the Start Time. For example, if you set the Start Time to next Sunday at 2AM and the Recurring Interval to 07:00:00 (Days:Hours:Minutes), then the volumes will be synced every Sunday at 2AM.
When you are doing a one-time or recurring sync or bsync of multiple volumes, you can choose to either sync the volumes individually or as a VSS snapshot set. When you choose the latter by checking the Use VSS snapshot sets checkbox, a single snapshot set will be taken of all the volumes simultaneously. This ensures that the volumes are consistent with one another if you are running an application such as a database server that requires data consistency across the volumes.
The Real-time Replication section is used to control the replication behavior. The Snapshot Interval specifies the time interval between VSS snapshots for the volumes being replicated. Prior to taking the snapshot set, wsyncr marks the current end of the volume change queue. It then takes a snapshot set of the volumes being replicated, and processes the change queue. The interval is measured from the start of one VSS snapshot set to the start of the next. If wsynr is unable to complete the full change queue during the interval, it will continue with the current snapshot set until the queue is empty. It will then immediately process the next snapshot set (to pick up any volume changes that occurred while processing the previous queue data).
If you require the target volumes to remain internally consistent with one another at all times in order to support applications such as a database server in a disaster recovery (DR) environment, then check the Maintain target volume consistency checkbox. When this is checked, the wfstd process running on the target machine will take a snapshot set of the target volumes before applying any of the changes from the source machine. At the end of a successful update, the target snapshots are deleted. If the source machine should fail during the update, the target process will roll back all volumes in the snapshot set. This ensures that the target volumes are always internally consistent.
Using the Command field, you can set any other wsyncr configuration value or enter a wsyncr command. Simply enter the parameter or command and click on the Enter button. For example, entering -p 10 would increase the size of the connection pool to 10. See wsyncr Command Syntax and Configuration Options for the full set of options.
Be sure to click on the Save Settings button after making changes to your configuration. If the wsyncr process running on the source machine is restarted for any reason (e.g., the machine crashed or was taken off line for maintenance), it will start up and return to the state at which you last saved the configuration. If you same the configuration with the volumes fully mapped and the the system in the run state, then your systems will automatically resume replication upon any unexpected restart.
Starting and Controlling Operation
After you have finished mapping your volumes and set any additional configuration, you are ready to start operation. Wsyncr operation is controlled using the buttons on the upper right of the screen. These include:
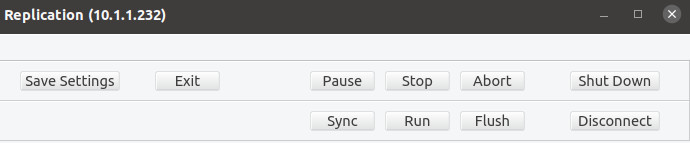
| Run | Begin operation. |
| Sync | Start any scheduled sync operations now rather than waiting for their initial start or recurring interval. |
| Flush | If there are any volumes current in replication mode, take a VSS snapshot set and process the change queue now rather than wait for the next scheduled snapshot interval. |
| Pause | Finish any current running operations (sync or replication snapshots) and then pause when done. The replication change queue will remain active although no new updates will be sent to the target. You can resume operation by clicking on the Run button. There will be no need for an initial sync on the replicating volumes. If the previous snapshot interval has been reached while paused, an update will begin immediately. |
| Stop | Finish any current running operations (sync or replication snapshots) and then stop when done. This will shut down the replication change queue. You can resume operation by clicking on the Run button, but an initial sync operation will be run on all volumes in replication mode. |
| Abort | Immediately stop all operations in progress. This will leave the target volumes in an inconsistent state unless you have target-snapshots configured. |
| ShutDown | This will Stop the system, shut down the wsyncr process on the source, and exit wrepl. You will need to manually restart the WfstRepl service on the source machine in order to restart replication. |
| Disconnect | This will close all connections between the source and target machines. Do not click on this button while any operations are in progress. |
| Exit | Leave all operations running and exit wrepl without shutting down wsyncr and the replication process. |
At this point, if you are ready to begin, click on the run button to begin operations. If you want wsyncr to automatically reconnect to the target and restart operations if the source machine restarts, then click on the Save Settings button to capture the system's current run state.
The Operation Status Screen -- Monitoring Operation
Once the system is running, switch to the Operation Status tab to monitor operation. This provides a display that looks similar to the following figure.

The Operation Status tab displays your mapped volumes and the current status of any operations configured on those volumes. By default all of the status tabs -- Operation Status, Volume Details, Statistics, and Queues -- will automatically refresh at the rate specified in the Auto Refresh Rate pull down box. You can set the rate from once a second to once a minute, and have the option to turn off refresh. The Refresh button on all of the status tabs allows you to manually refresh the screen.
The Src column displays the name of the source volume. The Volume Path column displays the Windows device name for the volume. The Size column displays the size of the source volume. The Target column displays the location where the data is mapped on the target. This will include both the target volume and directory, if any.
The Status column displays a set of single character status indicators for the volume and consists of the following values:
| I | The system is ignoring any sync errors on the volume |
| E | There has been at least one error on the volume |
| D | The target disk is full |
| W | There has been at least one warning on the volume |
| A | The volume is currently attached to the replication driver |
| S | There is an active VSS snapshot of the volume |
| V | The volume's VSS snapshot has dropped -- likely not enough free space |
| C | The target volume is in a consistent state |
| U | The target volume is not in a consistent state |
| F | The target volume is currently flushing recent updates to disk |
The State column displays the current state of any operation for the volume. This has the following values:
| Off | No operations will be performed on the volume |
| Wait | The volume is waiting to start an operation. This may be followed by two letters. The first specifies the operation that will be performed. The second specifies the state after the operation completes. Values are S, for sync, R, for run, O for off. So "Wait S R" will perform a sync and then transition to the run state. "Wait S S" will perform a recurring sync. "Wait S O" will perform a single sync. |
| Sync | The volume is currently being synced. This will be followed by a single letter that specifies the next state, which will be one of S, R, or O. |
| Run | The volume is currently in the replication state. |
| Error | The volume encountered an error that requires a manual reset. |
The Starts In column displays the time remaining until the operation is scheduled to run. If it displays --:--:--, the system is currently off and the operation will not begin until there is a change in the system state. Note that the system will only sync one volume at a time. If the time interval is shown as 00:00:00, then it is ready to run, but is waiting for another operation to finish. This is typically seen when syncing more than one volume as the system will only sync one volume at a time.
When a volume operation is in the Sync or BSync state, as is volume C:/ in the figure above, the Starts In column will show syncing. The Copied column will display the number of bytes that have been copied to the target and the number of files copied or updated on the target. The Processed column will show the total number of bytes and files processed on the source. When newly populating the target volume, the Copied and Processed columns should be the same. If the target has been previously synced, then they will typically differ. The final column displays the total number of bytes processed as a percentage of the size of the source volume. This provides a rough indicator of the remaining time before the operation completes.
If the sync operation is set for recurring mode, then upon completion, the operation status will return to the Wait S S state and Starts In will display the time until the next sync.
If the sync operation is set to transition into the run state, then upon completion, the operation status will transition to the PostSync state while all of the volume changes that were queued while it was syncing get copied to the target. When this has finished, it will transition to the Run state and will participate with the other running volumes in the periodic replication updates.

A volume that is currently in the run state will have a Status that includes either C (consistent), U (inconsistent), or F (flushing to disk on the target). Starts In will either display the time remaining until the next VSS snapshot, or it will display waiting to indicate that it is waiting to start, or working to indicate that the volume has an active snapshot and the change queue is currently being processed. Copied will display the size of the data that has been replicated to the target, and Processed will display the number change operations that have been processed for the volume.
Errors and Warnings
Errors can occur for a variety of reasons. The most common being:
Error: No Space on the Target Volume. This will immediately stop the volume operation and move the volume into the Error state until you fix the issue and reset the error.
Error: VSS Snapshot Dropped. This will happen if the source volume snapshot drops due to lack of space. If it happens during a sync operation, the operation will be automatically restarted. If it happens during a replication update, the update will be restarted unless you are using target-side snapshots, in which case the operation will abort and restart with the initial sync phase. This can also happen if the target volume snapshot drops due to lack of space if you are using target-side snapshots. This will cause the operation to abort and restart with the initial sync phase.
Error: Unable to Write to a File on the Target. Both the sync and replication operations require access to all files on the target volumes. The target volumes should be inactive during all operations. If you must access data on the target volumes while the system is running, take a VSS snapshot of the target volume and mount it for read only access. Encountering this error will cause the operation to fail.
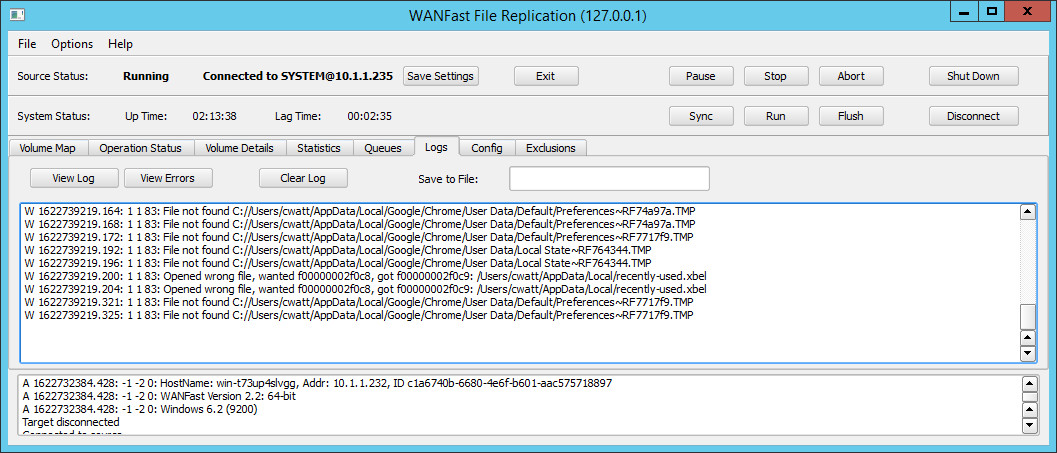
Warning: File Not Found during a replication update. This is commonly seen and is generally not an error. Because there is a time lag between the receipt of a change event and it being processed and sent to the target, temporary files used by the the system and applications may have been deleted. Files on a Windows NTFS file system have a unique ID and can be opened directly using the ID. If the file is not found on the source volume, it is because it has already been deleted. Although these are not errors, they are logged anyway for informational purposes.
Warning: Opened The Wrong File. Again, due to lag, a temporary file was deleted and then a new file of the same name was created. This file has a new, different ID. This is not an error. The system will eventually catch up to the event that created this new version of the file. These warnings are logged for informational purposes.
Warning: Unable to Set File Attributes. This may occur when you are copying files using NameID mode when the source machine is specifying an account name that does not exist on the target. This will prevent a sync operation from continuing on to the replication state unless you have set the Ignore Errors flag on the volume.
The Operation Status Volume Menu
Selecting a source volume in the Operation Status tab and clicking on the right mouse button will raise the Volume Menu as shown in the figure below.
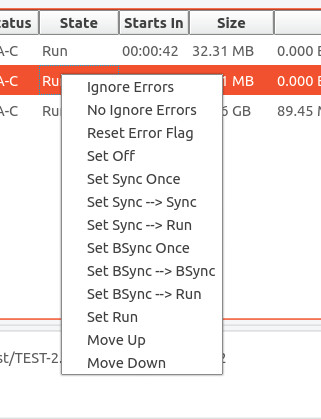
If there have been errors while syncing a volume that you do not care about -- such as an Account name on the source that does not exist on the target -- and you with to transition into the replication state despite the errors, then select Ignore Errors. This will set the I value in the Status field. If you wish to turn this off, select No Ignore Errors. If there have been errors on the volume, you can select Reset Error Flag to clear the error indication. You can reset the volume state by selecting one of the Set xxx options. For example, if you run a sync operation not knowing that the target was missing some Accounts, you might reset the error flag, set the ignore errors, and then reset the volume state to Sync --> Run. It will then restart the sync operation, this time ignoring the attribute errors and continuing on to the run state after the sync. Note that changing a volume's operating state from this menu only effects the volumes current state. It does not change the volume's configured initial state that you set for the volume mapping.
You can also change the order in which the volume operations will occur by selecting Move Up or Move Down to change the volume's order in the list.
Terminating the Sync or Replication Operation
There are several reasons to stop processing. If you want to:
Stop Everything Now Because it isn't Working as You Expected
Click on the Abort control button. This will set the system state to Aborting and immediately stop all running operations. When complete, it will put the system into the Inactive state and all volumes will revert back to their initial state. You can make what ever changes you need to the configuration and then restart using the run button. Warning! This will leave your target volumes in an inconsistent state.
Stop with the Target Disks in a Consistent State
This is the standard way to stop the system so that you can use the target machine in full production mode. Before stopping the system, make sure that all replicating volumes have made it through at least two working cycles. If there no operations are currently running, make sure that all volumes are displayed with a C (consistent) status. This will ensure that your target volumes are in a consistent state after stopping.
You can force an immediate update of the most recent changes to the target machine prior to shutting down by clicking on the Flush control button. This will ignore any remaining start time and immediately begin the update.
To stop the system, click on the Stop control button. This will put the system into the Stopping state. All currently active operations will complete, after which the system will transition into the Inactive state. The system will stop monitoring volume changes. If you restart after stopping, all volumes will revert back to their initial state.
Stop with the Target Disks in a Consistent State and Keep the Change Queue Running
This is the preferred approach for temporarily halting a replication so that you can make changes without needing to restart the initial sync phase. This might be used if you need to reboot the target machine or make changes to the network environment. Before pausing the system, make sure that all replicating volumes have made it through at least two working cycles and are all displayed with a C (consistent) status. This will ensure that your target volumes are in a consistent state after pausing.
You can force an immediate update of the most recent changes to the target machine prior to pausing by clicking on the Flush control button. This will ignore any remaining start time and immediately begin the update.
To pause the system, click on the Pause control button. This will put the system into the Pausing state. All currently active operations will complete, after which the system will transition into the Paused state. While in the Paused state the system will continue to monitor and queue volume changes. If you restart after stopping, the system will restart by flushing the change queue to the target without reverting the volumes to their initial state.
WARNING, do not leave a busy machine in the paused state for an extended length of time. The change queue will eventually get flushed from internal memory to local disk, gradually consuming disk space on the source machine. You can monitor the amount disk space consumed by the queue using the Queues Status Screen.
Exit the wrepl GUI Without Stopping Any Operations
Simply click on the Exit control button. Alternately you can use the File menu bar Exit, or simply close the program window.
Exit the GUI and Shutdown the Replication Process on the Source Machine
Clicking on the Shutdown control button will shut down the replication program and driver running on the source machine and then exit the GUI. Warning! doing this without first cleanly stopping the replication may leave your target volumes in an inconsistent state.
The Volume Details Screen
The Volume Details tab displays detailed statistics for the selected volume. You can reach the screen by double-clicking on the desired volume in the Operation Status tab. Or you can select the tab directly and then choose the volume using the Volume drop down. Click on the figure below to see the full extent of the detailed statistics, which include details on the volume, current replication statistics, and statistics on the last sync operation.
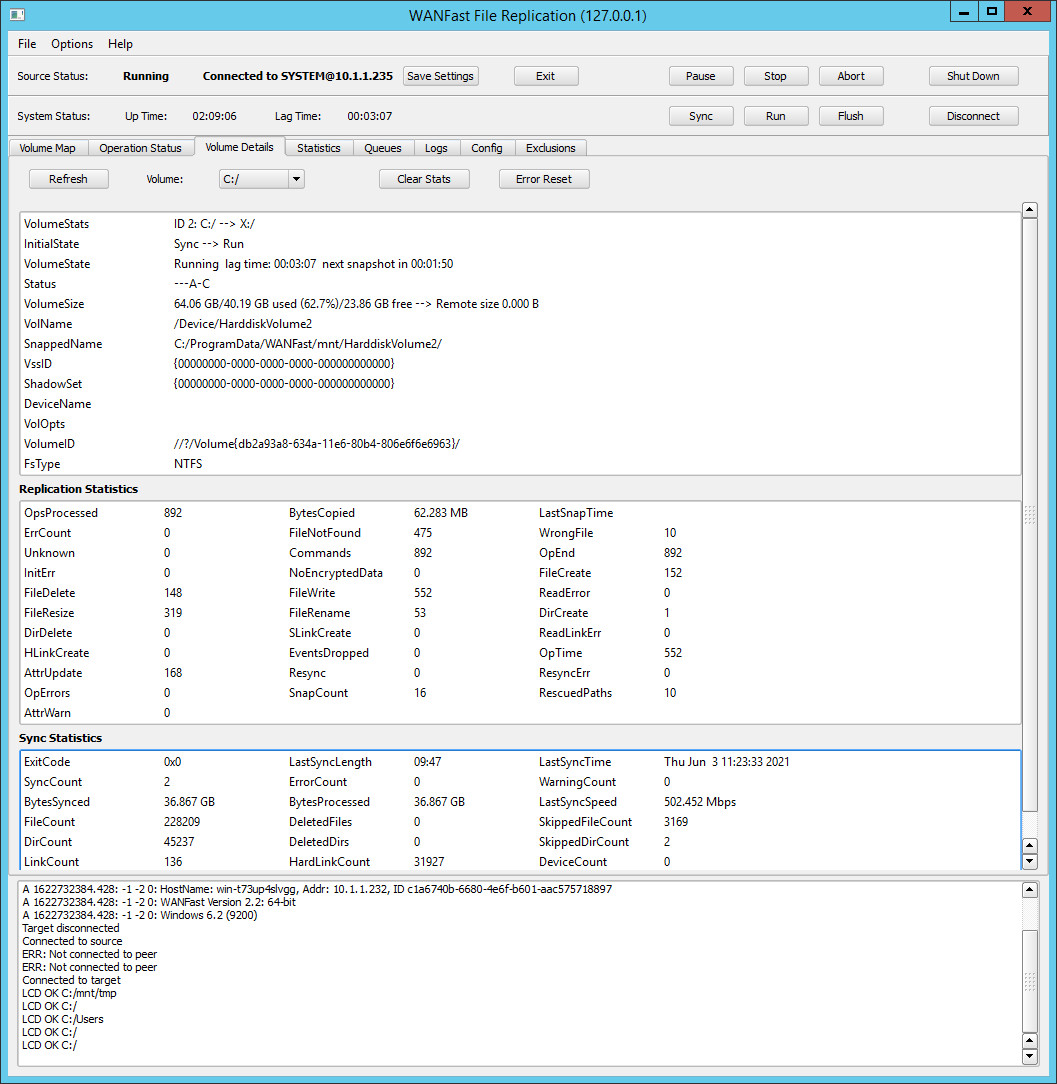
You can clear (reset) the volume statistics using the Clear Stats button. Clicking on the Error Reset button will clear any error flag for the volume.
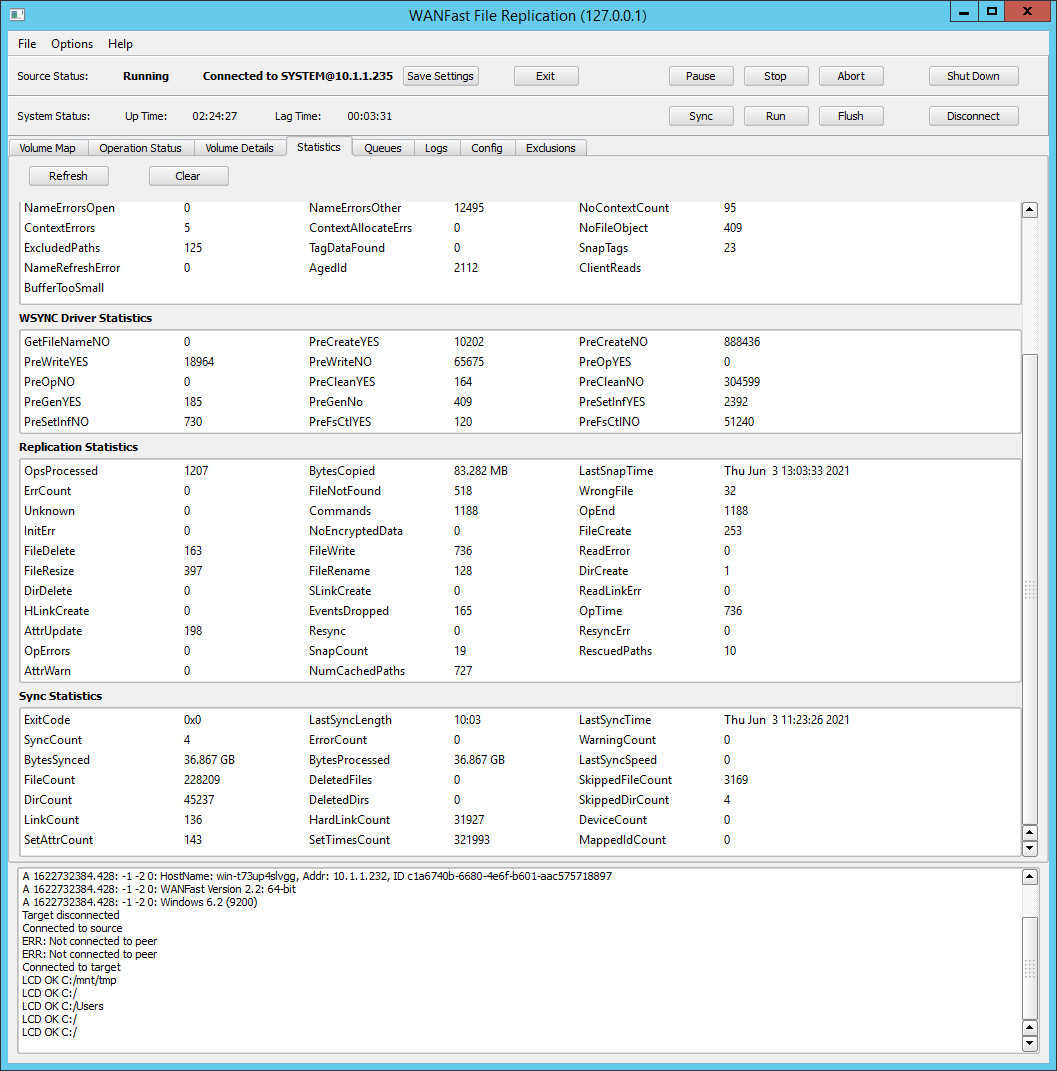
The Statistics Screen
The Statistics tab displays detailed system statistics. Click on the figure below to see the full extent of the detailed statistics, which include the driver configuration, the kernel filter statistics, the driver statistics, the accumulated replication statistics, and the statistics for the more recent sync operation.
Clicking on the Clear button will clear (reset) the statistic counters.
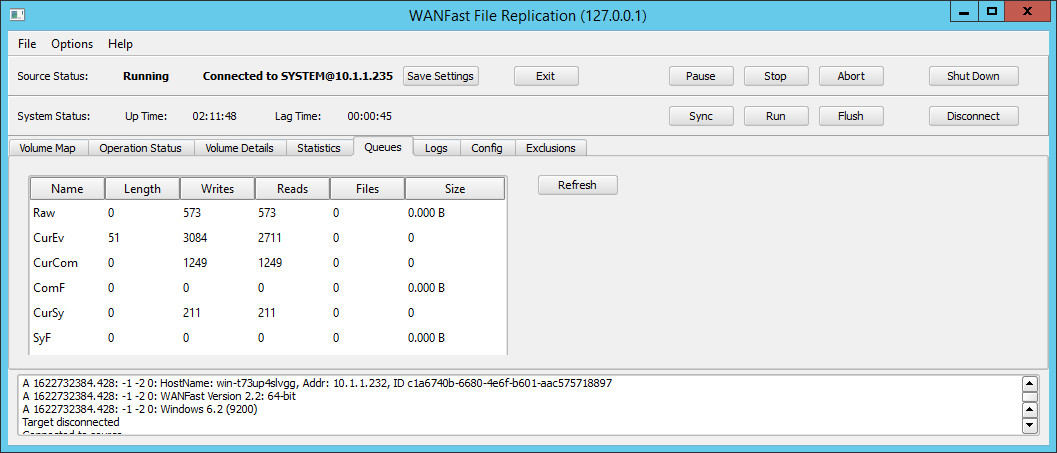
The Queues Screen
The Queues tab displays the current state of the volume change queues. The two right-most columns display the number of queue files written to the source disk, and the total disk space consumed by those files. When the in-memory event queues become full, the queue rolls over into a set of queue files in C:\ProgramData\WANFast\syncLogs. This can occur for any of several reasons:
- The source machine's disk activity is extremely busy and the replication system cannot keep up. This is usually a temporary situation that corrects itself automatically when the machine becomes less busy.
- The Snapshot Interval has been set quite long, in which case you might consider decreasing it.
- The network between the source and target has become slow or unstable slowing the updates to the target machine.
- The system has been Paused for a while.
The Logs Screen
The Logs tab allows you to view the process log file on the source machine and search it for errors. Clicking on the the View Log button will display the full contents of the log file. If you put a path name into the Save to File field, the contents of the log file will be copied to a file at that path on the local machine. Clicking on the View Errors button filters the log file and only displays all errors that are found. This output can also be saved to a file. Clicking on the Clear Log button will clear the contents of the log file on the source machine. You might want to search for errors before clearing the log file.
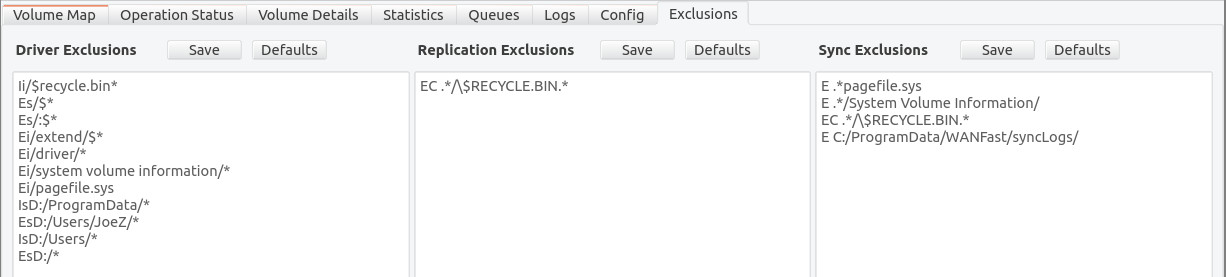
The Exclusions Screen
The Exclusions tab displays the system-wide lists of exclusion/inclusion rules and allows you to edit them manually. There are three separate sets of rules. The Driver Exclusions are applied by the wsyncd driver within the Windows system context in order to remove paths from the change queue. It has a very simple format that allows you to exclude entire directories from the replication process. The Replication Exclusions are applied by the wsyncr process to further filter the change queue. It supports full regex pattern matching, allowing you to be much more precise in what you exclude. The Sync Exclusions are used by the sync process that is used for the initial population of the target volume. All rules in the Driver Exclusions are automatically applied to the sync operation, so you do not need to replication them in the Sync Exclusions. However, if you add any rules to the Replication Exclusions, then you probably want to add them to the Sync Exclusions as well.
For all three sets of rules, if the pattern begins with a drive specification, such as "C:/", then it will apply to just that drive. Otherwise it will apply to all drives. The rules are order dependent and processing will stop with the first matching rule.
If you are creating a set of rules for a specific volume, you find it easier to do so using the Source Volume Mapping Screen, which has a built in browser for picking directories and creating rules. However, there is one important difference between the two -- if the volume is being actively replicated, then changing the rules from the Source Volume Mapping Screen will cause the volume to restart operation and rerun the initial volume sync. Changing rules from the Exclusions Screen will not cause the volume to restart with a sync.
Driver Pattern Format
Driver patterns are implemented within the kernel. They determine which file events get passed to the replication system. The patterns DO NOT support regular expressions. If the pattern begins with a drive specification, such as "C:/", then it will apply to just that drive. Otherwise it will apply to all drives. No wild cards or pattern matching are supported except for a terminating '*' to indicate a match regardless of any following characters. More complex filtering should use the Replication Patterns. The rules are order dependent and processing will stop with the first matching rule. The rule format is shown below:
MCPath, e.g., EsC:/Users/*
where
  M is the mode, which must be one of:
      E  - exclude the path
      I  - include the path
  C is the case sensitivity, which must be one:
      s - case sensitive
      i - case insensitive

There is no space between the mode, M, case C, or the pattern.
Aside from case sensitivity, the pattern specified in a Driver Pattern must match the actual path being tested exactly unless you add the special '*' character at the end of the path to indicate that the pattern should match regardless of additional characters in the path. Thus,
    EiC:/Users/ctw
NO    C:/Users/ctw2
NO    C:/Users/ctw/file

    EIC:/Users/ctw*
YES   C:/Users/ctw2
YES   C:/Users/ctw/file

    EIC:/Users/ctw/*
NO    C:/Users/ctw2
YES   C:/Users/ctw/file
To exclude a specific file, specify a rule such as: EiC:/Users/ctw/TheFile.
To exclude a specific directory and all of its children, specify a rule such as: EiC:/Users/ctw/TheDirectory/*
If you wish to exclude an entire directory and its children except for one subdirectory, you would need to use a set of rules such as the following to ensure that all of the desired subdirectory's parents are also included.
IiC:/Users/ctw/TheDirectory
IiC:/Users/ctw/TheDirectory/TheSubdirectory*
EiC:/Users/ctw/TheDirectory/*
Replication Pattern Format
The replication exclusion rules are used to filter the events received from the driver. If the pattern begins with a volume specification, such as "C:/", then it will apply to just that volume. Otherwise it will apply to all volumes. The Replication Patterns support full regex compatibility. Click here for help with regex syntax. The rules are order dependent and processing will stop with the first matching rule.
M[aAcCwW] Path, e.g., E C:/Users/.*/AppData/
where: M is the mode, which must be one of:
    E  - exclude the path
    I  - include the path

Optional regex controls:
    a  Do not force pattern anchoring
    A  Force pattern anchoring
    c  Case sensitive
    C  Case insensitive
    w  Do not ignore white space
    W  Ignore white space

There must be a space between the optional regex controls and the pattern.
For example, the following rules:
    I C:/Users/Joe/AppData/
    E C:/Users/.*/AppData/
Would include all application data for the user Joe, but would exclude application data for all other users.
Note that the regex pattern matches regardless of whether the path being tested has additional characters at the end. If you want the pattern to match the path exactly, you need to add the special '$' character to the end of the pattern
    E C:/Users/ctw
YES   C:/Users/ctw2
YES   C:/Users/ctw/file

    E C:/Users/ctw$
NO    C:/Users/ctw2
NO    C:/Users/ctw/file
Sync Pattern Format
The sync exclusion rules are only applied when performing an initial file-based volume synchronization prior to the start of replication. Note that all of the volume-specific Driver exclusions are automatically applied to the sync operation, so there is no need to replicate those here.
The sync exclusions provide full regex matching capabilities and use the same format as the Replication Patterns in the section above.
Unlike the replication process, which only copies changes made on the source machine to the target machine, the initial sync process attempts to make the target identical to the source. In doing so, by default, it will delete files and directories on the target that do not exist on the source. You can turn off file deletion on the target by entering the command set --no-delete-files in the Config tab Command line. Be sure to save the settings after doing so. You can also leave the default behavior on and exclude the specific portions of the target that you do not want deleted. You do this by prefixing a Sync Pattern with 'D'. For example, the rules:
    I D:/Documents/
    E D:/
    DE D:/Documents/OnTargetOnly/
Would only copy the directory D:/Documents and all its contents to the target. No other directories on D:/ would be copied. If the directory D:/Documents/OnTargetOnly/ exists on the target and not the source, the directory and all its contents will not be deleted, but any other files/directories in D:/Documents/ that exist on the target and not the source will be deleted.
NOTE that when specifying a file/directory on the target to exclude from deleting, you must specify the path as seen by the source. For example, if you are copying D:/SourceLocation/Documents/ on the source to E:/TargetLocation/Documents/, then
    YES  DE D:/SourceLocation/Documents/OnTargetOnly/
    NO   DE E:/TargetLocation/Documents/OnTargetOnly/